
Table of Contents
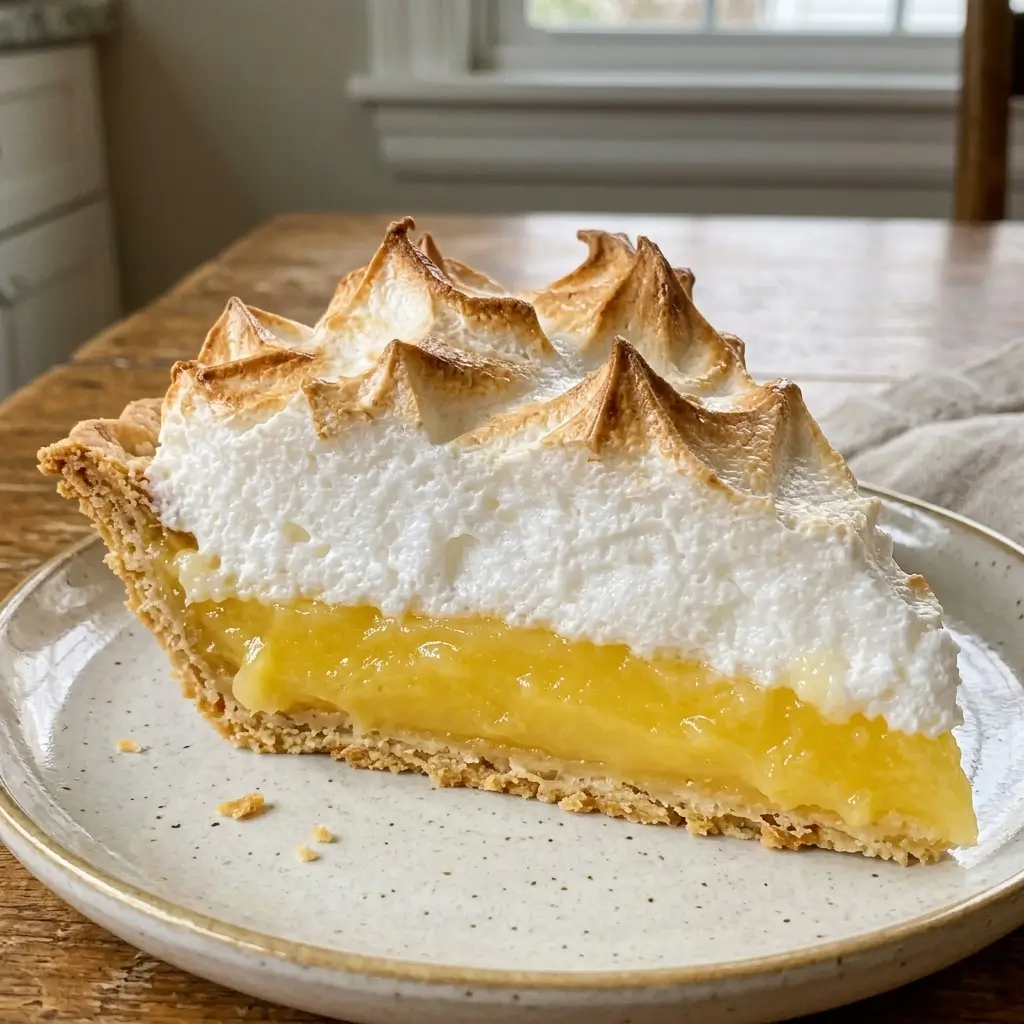
The Lemon Meringue Pie That Tastes Like Sunday
There are desserts you make because they’re easy. And then there are desserts you make because they matter.
Lemon Meringue Pie is the latter. It’s the pie that shows up at Easter lunch, at birthday dinners, at the table when someone needs to feel celebrated. It’s the pie that says, “I took my time with this. I wanted it to be beautiful for you.”
I remember the first time I made one from scratch. I was terrified of the meringue—all those horror stories about weeping, shrinking, and deflating. But then I watched my grandmother do it, her hands steady and sure, spreading those glossy white peaks over the hot lemon filling with the confidence of someone who’d done it a hundred times. “The secret,” she said, “is to seal it to the crust. Don’t leave any gaps. The meringue needs to hold hands with the edges.”
I’ve never forgotten that.
This pie is a labor of love, but it’s not difficult. It’s just a series of small, intentional steps: blind-baking the crust until golden, whisking the lemon filling until it’s thick and glossy, whipping the egg whites until they stand tall and proud. And then—the magic moment—toasting those peaks in the oven until they’re kissed with gold.
The result? A pie that’s sweet and tart, creamy and cloud-like, all at once. A pie that makes people close their eyes after the first bite. A pie that feels like Sunday dinner, no matter what day it actually is.
Let’s make it together.
Why This Recipe is Worth Every Minute
- A Showstopper That’s Actually Doable: Yes, it has three components. But each one is simple on its own. The crust bakes while you make the filling. The filling cooks in one saucepan. The meringue whips up in minutes. You’ve got this.
- That Perfect Sweet-Tart Balance: The lemon filling is bright, tangy, and just sweet enough. The meringue is pillowy and lightly sweet. Together, they create a harmony that keeps you coming back for “just one more slice.”
- Nostalgia on a Plate: This is old-fashioned comfort at its finest. It’s the pie your grandmother made, the pie that appeared at church potlucks and family reunions. It carries history in every bite.
- Impressively Beautiful: That golden, toasted meringue with its delicate peaks? It looks like something from a bakery window. But you made it. In your kitchen. And that feels good.
Meet Your Ingredients (The Building Blocks of Beauty)
Three components, each with its own simple cast of characters. Nothing fancy, nothing intimidating—just good ingredients doing their thing.
For the Crust:
1 Unbaked 9-Inch Pie Crust – Store-bought works beautifully here—just check the label for halal compliance. Homemade is even better if you have a favorite recipe. The crust is the sturdy, buttery foundation that holds everything together. Think of it as the stage for the star of the show.
Pie Weights or Dried Beans – For blind baking. This keeps the crust from puffing up and ensures an even, golden bake. No soggy bottoms here.
For the Lemon Filling:
1½ Cups Granulated Sugar – The sweetness that balances the tart lemon. And don’t reduce it—the sugar also helps thicken the filling. It’s doing double duty.
⅓ Cup Cornstarch – The secret to a sliceable, glossy filling. It thickens without eggs alone, giving you that beautiful, clean cut. This is what makes it look like it came from a bakery.
¼ Teaspoon Salt – A quiet enhancer. It makes the lemon taste more like lemon. Trust me on this one—it’s the little things.
1½ Cups Water – The liquid base that lets everything simmer together.
½ Cup Fresh Lemon Juice – Please, please use fresh. Bottled lemon juice tastes flat and lifeless compared to the real thing. You’ll need about 3 to 4 lemons. It’s worth the extra squeeze.
2 Teaspoons Finely Grated Lemon Zest – This is where the magic lives. The zest carries the essential oils that give the filling its bright, aromatic punch. Don’t skip it.
4 Large Egg Yolks – For richness and that beautiful golden color. Save the whites for the meringue! Nothing goes to waste here.
3 Tablespoons Unsalted Butter – Stirred in at the end, it adds a silky, luxurious finish. It’s the little pat of love that makes everything better.
For the Meringue:
4 Large Egg Whites, Room Temperature – Room temperature whites whip up higher and more stable. Let them sit on the counter for 30 minutes before starting. This is not a step to rush.
½ Cup Granulated Sugar – Added gradually to create stiff, glossy peaks. Patience pays off here.
¼ Teaspoon Cream of Tartar – The stabilizer that keeps your meringue from weeping or collapsing. It’s the unsung hero of the meringue world.
½ Teaspoon Vanilla Extract – A gentle flavor enhancer. Check your brand for alcohol content.

Let’s Make It: A Step-by-Step Labor of Love
Step 1: Bake the Crust
Preheat your oven to 375°F (190°C). Roll out your pie crust and fit it into a 9-inch pie plate. Crimp the edges beautifully—this is your chance to make it look special. Line the crust with parchment paper and fill with pie weights or dried beans. Bake for 15 minutes, then remove the weights and parchment. Bake for another 5 to 10 minutes, until the crust is lightly golden. Let it cool slightly while you make the filling. Your kitchen is already starting to smell like something good.
Step 2: Make the Lemon Filling
In a medium saucepan, whisk together the sugar, cornstarch, and salt. Gradually whisk in the water and lemon juice until completely smooth—no lumps allowed. Place the saucepan over medium heat and cook, stirring constantly with a whisk, until the mixture thickens and begins to bubble. This takes about 5 to 7 minutes. Don’t walk away—it can scorch. Stay with it, keep stirring, and you’ll be rewarded.
Step 3: Temper the Eggs
In a separate bowl, whisk the egg yolks until smooth. Slowly—very slowly—whisk a ladleful of the hot lemon mixture into the yolks. This is called tempering, and it prevents the eggs from scrambling. Once incorporated, add another ladleful. Then pour the yolk mixture back into the saucepan, whisking constantly. You’re basically introducing the eggs to the heat gently, so they don’t freak out. It’s a little dance, and you’ve got the moves.
Step 4: Finish the Filling
Cook the mixture for another 1 to 2 minutes, whisking constantly, until it’s thick, glossy, and pudding-like. Remove from heat and stir in the butter and lemon zest until smooth and melted. Pour the hot filling into your baked pie crust and spread it evenly. Take a second to admire it—it’s already looking gorgeous.
Step 5: Make the Meringue
In a clean, grease-free bowl (this is crucial!), beat the egg whites and cream of tartar with an electric mixer until soft peaks form. Soft peaks look like little hills that flop over at the tip. Gradually add the sugar, one tablespoon at a time, beating well after each addition. Continue beating until stiff, glossy peaks form—they should stand straight up when you lift the beaters. Mix in the vanilla extract. You just made meringue magic.
Step 6: Assemble the Pie
Spread the meringue over the hot lemon filling, making sure it touches the crust all the way around the edges. This seals the meringue to the crust and prevents shrinking. Use the back of a spoon to create decorative peaks and swirls—this is your artistic moment. Go ahead, make it pretty.
Step 7: Bake the Meringue
Reduce the oven temperature to 350°F (175°C). Bake the pie for 12 to 15 minutes, until the meringue peaks are lightly golden brown. Watch it carefully—meringue can go from golden to burnt quickly. Stay close, keep an eye on it.
Step 8: Cool and Chill
Cool the pie at room temperature for about 1 hour. Then refrigerate for at least 3 hours—overnight is even better—before slicing. This chilling time allows the filling to set fully, giving you clean, beautiful slices. Patience is the secret ingredient here.
Step 9: Serve and Savor
Slice with a sharp knife dipped in hot water and wiped dry between cuts. Serve chilled. Watch faces light up. Take a bite, close your eyes, and enjoy every bright, creamy, cloud-like second.
Now go ahead—slice yourself a piece, savor every bite, and enjoy the look on everyone’s faces. You just made a lemon meringue pie from scratch, and it’s absolutely stunning. 🍋✨
Pro-Tips for Pie Perfection
These are the little things that separate a good pie from a wow pie. Nothing complicated—just a few tricks I’ve learned along the way.
The Clean Bowl Rule
Your mixing bowl and beaters must be completely clean and grease-free when whipping egg whites. I know it sounds fussy, but it really matters—any trace of fat will keep them from reaching stiff peaks, and you’ll be standing there wondering why nothing’s happening. Wash everything with hot, soapy water, dry it thoroughly, and you’re good to go.
Temper Slowly
When you’re adding hot liquid to egg yolks, go slow and whisk constantly. If you dump too much hot liquid in too fast, you’ll end up with scrambled eggs—and nobody wants that in a lemon pie. Take your time, pour in a steady stream, and keep that whisk moving. Patience here really does pay off.
Seal the Edges
Spread the meringue all the way to the crust, touching it firmly. This creates a seal that prevents the meringue from shrinking away from the edges as it bakes. It’s a little detail that makes a big difference—no sad, gaping moat around your beautiful meringue.
Watch the Broiler (If Using)
If you want to torch the meringue instead of baking it, use a kitchen torch for precise control. If you’re using the oven broiler, stay right there and watch it—meringue can go from golden to burnt in seconds. Seriously, don’t walk away. Just stand there and babysit it. It’s worth it.
- Sharp Knife, Hot Water: For the cleanest slices, dip your knife in hot water and wipe it dry between each cut. The heat helps the knife glide through the meringue and filling without dragging.
- Make It Ahead: You can bake the crust and make the filling a day ahead. Keep the filling refrigerated with plastic wrap pressed directly onto the surface to prevent a skin from forming. Assemble and bake the meringue the day you plan to serve.
Your Lemon Meringue Questions, Answered!
Q: Can I use bottled lemon juice?
A: You can, but the flavor will be noticeably flatter. Fresh lemon juice is brighter, more aromatic, and simply better. If you must use bottled, add an extra teaspoon of zest to compensate.
Q: My meringue is weeping (releasing liquid). What went wrong?
A: Weeping usually happens when the meringue isn’t cooked enough or when it’s spread over cold filling. Make sure you spread the meringue over the hot filling, and bake it long enough for the meringue to cook through.
Q: Can I make this gluten-free?
A: Yes! Use a gluten-free pie crust (store-bought or homemade with gluten-free flour). The filling and meringue are naturally gluten-free.
Q: How do I prevent the meringue from shrinking?
A: Seal the meringue to the crust all the way around the edges. This anchors it and prevents it from pulling away as it bakes and cools.
Q: Can I use a torch instead of baking the meringue?
A: Absolutely. After spreading the meringue, use a kitchen torch to gently brown the peaks. This gives you more control and avoids any risk of over-baking.
Q: How long does this pie last?
A: Store covered in the refrigerator for up to 3 days. The meringue may soften slightly over time, but it will still be delicious.
There it is. The pie that takes a little time, a little patience, and a whole lot of love. It’s the pie that makes people feel special. It’s the pie that turns an ordinary dinner into a celebration.
It’s the pie that tastes like Sunday.
Now, who are you making this for?
You Might Also Like
- Blueberry Cream Cheese Crescent Rolls (So Easy!)
- Easy Apple Pancakes with Cinnamon Apple Topping
- 4-Ingredient Cottage Cheese Chocolate Pudding (Very Easy

Classic Lemon Meringue Pie (Old-Fashioned Recipe)
Course: DessertCuisine: AmericanDifficulty: Intermediate8
servings30
minutes30
minutes380
kcal4
hours380 Calories | 4g Protein | 62g Carbs | 13g Fat
5
hoursThis classic Lemon Meringue Pie features a buttery crust, bright and tangy lemon filling, and a cloud of toasted meringue. The perfect old-fashioned dessert for holidays and special occasions!
Ingredients
For the Crust:
1 unbaked 9-inch pie crust
Pie weights or dried beans (for blind baking)
For the Lemon Filling:
1½ cups granulated sugar
⅓ cup cornstarch
¼ teaspoon salt
1½ cups water
½ cup fresh lemon juice (about 3-4 lemons)
2 teaspoons finely grated lemon zest
4 large egg yolks
3 tablespoons unsalted butter
For the Meringue:
4 large egg whites, room temperature
½ cup granulated sugar
¼ teaspoon cream of tartar
½ teaspoon vanilla extract
Directions
- Preheat oven to 375°F (190°C). Blind bake pie crust until lightly golden. Cool slightly.
- In a saucepan, whisk sugar, cornstarch, and salt. Gradually whisk in water and lemon juice until smooth.
- Cook over medium heat, stirring constantly, until thickened and bubbling.
- Whisk egg yolks in a separate bowl. Slowly whisk in a little hot lemon mixture to temper.
- Pour yolk mixture back into saucepan, whisking constantly. Cook 1-2 minutes until thick and glossy.
- Remove from heat. Stir in butter and lemon zest. Pour hot filling into baked crust.
- Beat egg whites and cream of tartar until soft peaks form. Gradually add sugar, beating until stiff, glossy peaks form. Mix in vanilla.
- Spread meringue over hot filling, sealing to crust edges. Create decorative peaks.
- Bake at 350°F (175°C) for 12-15 minutes until meringue is golden.
- Cool at room temperature for 1 hour, then refrigerate at least 3 hours before slicing.
Notes
- Use fresh lemon juice for the best flavor—bottled just doesn’t compare.
- Room temperature egg whites whip up higher and more stable.
- Seal the meringue to the crust to prevent shrinking.
- Store covered in the fridge for up to 3 days.



Leave a Reply